Vue js Standalone
https://www.javatpoint.com/vue-js
Standalone Script
Vue can be used as a standalone script file - no build step required! If you have a backend framework already rendering most of the HTML, or your frontend logic isn't complex enough to justify a build step, this is the easiest way to integrate Vue into your stack. You can think of Vue as a more declarative replacement of jQuery in such cases.
Vue also provides an alternative distribution called petite-vue that is specifically optimized for progressively enhancing existing HTML. It has a smaller feature set, but is extremely lightweight and uses an implementation that is more efficient in no-build-step scenarios.
<html>
<head>
<script src="https://cdn.jsdelivr.net/npm/vue@2.5.21/dist/vue.js"></script>
</head>
<body>
<div id="app">
<p>{{ message }}</p>
</div>
<script>
new Vue({
el: '#app',
data: {
message: 'Hello Vue.js 123!'
}
})
</script>
</body>
</html>
Using CDN
We can also start using VueJS file from the CDN library. The link https://unpkg.com/vue will give the latest version of VueJS. VueJS is also available on jsDelivr (https://cdn.jsdelivr.net/npm/vue/dist/vue.js) and cdnjs (https://cdnjs.cloudflare.com/ajax/libs/vue/2.4.0/vue.js).
We can host the files at our end, if required and get started with VueJS development.
Example 1:
Check the version of your installed Vue.js
If you are already familiar with Node.js and have installed Vue.js CLI on your system, you can check the version of your installed Vue.js using the following command on your Node.js command prompt:
- Open the Node.js command prompt and run the following command:
Mine - 2.9.6 (June 5 2022)
| Stable release | 3.2.33 / 14 April 2022 |
Vue.js Conditions & Loops
Conditions and Loops are used in all programming languages to provide repetitive control structures. They can repeat one or more various steps depending on the conditions. Same we can use in the case of Vue.js
.
v-if Directive Example
- <div id="app">
- <span v-if="seen">This is visible to you</span>
- </div>
v- for Directive Example
The v-for directive is used to display a list of items using the data from an Array. See the following example.
- <div id="app-4">
- <ol>
- <li v-for="todo in todos">
- {{ todo.text }}
- </li>
- </ol>
- </div>
Index.js file:
Output:
- HTML Tutorial
- CSS Tutorial
- JavaScript Tutorial
- AngularJS Tutorial
- js Tutorial
Handling User Input
The v-on directive facilitates users to interact with your Vue.js app. It is used to attach event listeners that invoke methods on Vue instances. Let's see an example of v-on directive.
v-on Directive Example
- <p>{{ message }}</p>
- <button v-on:click="reverseMessage">Click Here to Reverse Message</button>
v-model Directive Example
The v-model directive is used to make two-way data binding between form input and app state. See the following example:
- <input v-model="message">
- data: {
- message: 'Two way data binding!'
- }
Composing with Components
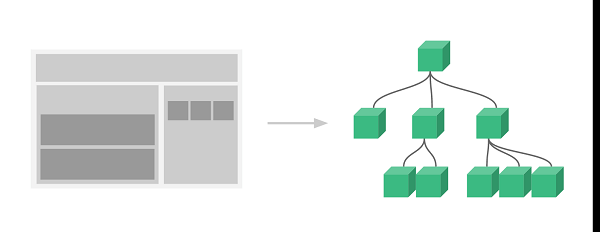
The component system is used when we want to build large-scale applications composed of small, self-contained, and often reusable components. A large application interface can be abstracted into a tree of components:
Here, we use the v-bind directive to pass values in repeated component. See the following example:
Index.html file:
Index.js file:
Output:

Vue.js Instance
To start a Vue application, you have to create a new Vue instance by using the Vue function. Whenever we create a new Vue project, the Vue instance gets activated by default in the main.js file. It is also called a root Vue Instance.
Syntax:
Vue's application design is inspired by the MVVM pattern. As a convention, we have to use the variable vm (short for ViewModel) to refer to our Vue instance. When you create a Vue instance, you have to pass in an options object. In this article, you will learn how you can use these options to create your desired behavior.
A Vue application contains a root Vue instance created with a new Vue. It is organized into a tree of nested and reusable components. For example, if you create a todo app, then its component tree might look like the following image:
Index.html file:
Index.js file:
Vue Instance Lifecycle Hooks
Every Vue instance goes through a series of initialization steps. When you create an instance, it needs to set up data observation, compile the template, mount the instance to the DOM, and update the DOM when data changes. This process is known as the lifecycle of a Vue instance.
Lifecycle Diagram of the Vue Instance
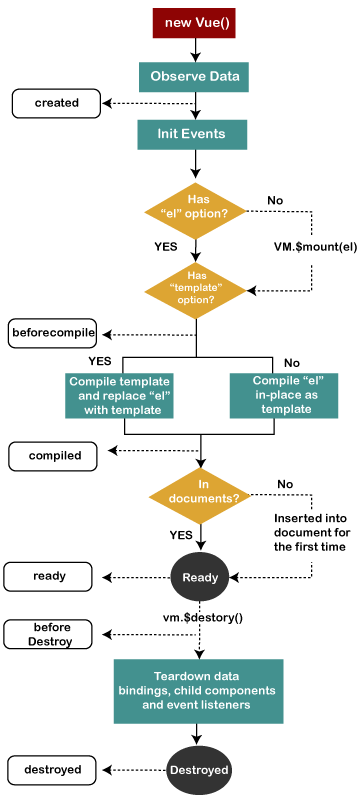
Explanation of Vue Instance Lifecycle Hooks
Following is the list of all events or hooks a Vue instance goes through. There are eight lifecycle events/methods or hooks for Vue.js Instance Lifecycle:
- Before create hook
- Created hook
- Before mount hook
- Mounted hook
- Before update hook
- Updated hook
- Before destroy hook
- Destroyed hook
beforeCreate() hook: The beforeCreate() hook is the first event or hook that occurs in the creation process. It facilitates developers to perform actions even before the component has been added to the DOM. We cannot access the DOM inside of this event. In this hook, the data is still not reactive and events that occur during the component's lifecycle have not been set up yet.
created() hook: The created() hook is used to run the code after creating the instance. It facilitates you to access the reactive data, but the mounting or rendering of templates and Virtual DOM is not completed yet. In this hook, events are active and access to reactive data is enabled though templates have not yet been mounted or rendered.
beforeMount() hook: The beforeMount() hook is used to execute just before the initial render happens and after the template or render functions have been compiled. It is invoked after the template has been compiled and the virtual DOM updated by Vue. This is the rarely used event, and in most cases, you don't need to use this event.
mounted() hook: The mounted() hook is the most frequently used event or hook. This hook provides you full access to the reactive component, templates, and rendered DOM In this hook; you have full access to the reactive component, templates, and rendered DOM.
beforeUpdate() hook: The beforeUpdate() hook is executed just before the data changes on the component and the update cycle's start. It runs right before the DOM is patched and re-rendered.
updated() hook: The updated() hook is used to execute after the data changes on the component and the DOM re-renders. If you want to access the DOM after a property change, it is the best place to complete this action.
beforeDestroy() hook: The beforeDestroy() hook is used to execute just before tearing down the instance. This is the second last step of the Vue Instance life process and is the right place to clean up events or reactive subscriptions if you have to do this.
destroyed() hook: The destroyed() hook is the last step of the Vue.js Instance life process and used to do any last minute clean up.
Vue.js Template
In the previous Vue.js Instance chapter, we have learned how to get an output in the form of text content on the screen. In this chapter, we will learn how to get an output in the form of an HTML template on the screen. Vue.js uses an HTML-based template syntax that facilitates Vue.js developers to declaratively bind the rendered DOM to the underlying Vue instance's data. All Vue.js
templates are valid HTML that can be parsed by spec-compliant browsers and HTMLparsers.If you choose the simple interpolation method i.e., with double curly brackets to display the HTML content on the web browser, it will show the wrong result.
Let's take a simple example and see the output to understand this concept well..
When we assign v-html directive to the html element, Vue.js knows that it has to output it as HTML content
- <div v-html>{{htmlcontent}}</div>
- data: {
- htmlcontent : "<div><h1>This is Vue.js Template Example</h1></div>"
- }
-----------------------------------------------------------------------------------------------------------
Demo Code
<html>
<head>
<title>My first Vue app</title>
<script src="https://cdn.jsdelivr.net/npm/vue@2.5.21/dist/vue.js"></script>
<script src="https://cdn.jsdelivr.net/npm/vue/dist/vue.js"></script>
</head>
<body>
<div id="app">
<button v-on:click="reverseMessage">Click Here to Reverse Message</button>
<br/>
<ol>
<li v-for="todo in todos">
{{ todo.text }}
</li>
</ol>
<br/>
<span>two way data binding</span><br/>
<input v-model="message">
<br/>
{{seen}}
<br/>
{{ message }}
<br/>
<span v-if="seen">This is visible to you</span> <br/>
<span v-bind:title="message">
Hover mouse over me for a few seconds
and see a dynamically bound title which I have set!
</span>
</div>
<script>
Vue.component('todo-course', {
props: ['todo'],
template: '<li>{{ todo.text }}</li>'
})
var app = new Vue({
el: '#app',
data: {
courseList: [
{ id: 0, text: 'Java' },
{ id: 1, text: 'PHP' },
{ id: 2, text: 'Angular' },
{ id: 3, text: 'Vue.js' }
],
todos: [
{ text: 'HTML Tutorial' },
{ text: 'CSS Tutorial' },
{ text: 'JavaScript Tutorial' },
{ text: 'AngularJS Tutorial' },
{ text: 'Vue.js Tutorial' }
],
seen: true,
message: 'You loaded this page on ' + new Date().toLocaleString()
},
methods: {
reverseMessage: function () {
this.message = this.message.split('').reverse().join('')
}
}
})
</script>
</body>
</html>
Comments
Post a Comment